Difference between revisions of "Running WRF-SFIRE with real data in the WRFx system"
| Line 217: | Line 217: | ||
} | } | ||
| − | For running fuel moisture model, terrain static data is needed. | + | For running fuel moisture model, terrain static data is needed. '''This is a separate file from the static data downloaded for WRF.''' To get the static data for the fuel moisture model, go to wrfxpy and do: |
wget <nowiki>http://math.ucdenver.edu/~farguella/tmp/static.tbz</nowiki> | wget <nowiki>http://math.ucdenver.edu/~farguella/tmp/static.tbz</nowiki> | ||
tar xvfj static.tbz | tar xvfj static.tbz | ||
this will untar a static folder with the static terrain on it. | this will untar a static folder with the static terrain on it. | ||
| + | |||
| + | This dataset is needed for the fuel moisture data assimilation system. The fuel moisture model run as a part of WRF-SFIRE doesn't need this dataset and uses data processed by WPS. | ||
===wrxpy: Testing=== | ===wrxpy: Testing=== | ||
Revision as of 15:15, 24 August 2020
Instructions to set up the whole WRFx system right now using the last version of all the components with a couple of working examples. WRFx consists of a Fortran coupled atmosphere-fire model WRF-SFIRE, a python automatic HPC system wrfxpy, a visualization web interface wrfxweb, and a simulation web interface wrfxctrl.
WRF-SFIRE model
A coupled weather-fire forecasting model built on top of Weather Research and Forecasting (WRF).
WRF-SFIRE: Requirements and environment
Install required libraries
- General requirements:
- C-shell
- Traditional UNIX utilities: zip, tar, make, etc.
- WRF-SFIRE requirements:
- Fortran and C compilers (Intel recomended)
- MPI (compiled using the same compiler, usually comes with the system)
- NetCDF libraries (compiled using the same compiler)
- WPS requirements:
- zlib compression library (zlib)
- PNG reference library (libpng)
- JasPer compression library
- libtiff and geotiff libraries
See https://www2.mmm.ucar.edu/wrf/users/prepare_for_compilation.html for the required versions of the libraries.
Set environment
Set specific libraries installed
setenv NETCDF /path/to/netcdf
setenv JASPERLIB /path/to/jasper/lib
setenv JASPERINC /path/to/jasper/include
setenv LIBTIFF /path/to/libtiff
setenv GEOTIFF /path/to/libtiff
setenv WRFIO_NCD_LARGE_FILE_SUPPORT 1
Should your executables fail on unresolved libraries, also add all the library folders into your LD_LIBRARY_PATH:
setenv LD_LIBRARY_PATH /path/to/netcdf/lib:/path/to/jasper/lib:/path/to/libtiff/lib:/path/to/geotiff/lib:$LD_LIBRARY_PATH
WRF-SFIRE: Installation
Clone github repositories
Clone WRF-SFIRE and WPS github repositories
git clone https://github.com/openwfm/WRF-SFIRE
git clone https://github.com/openwfm/WPS
Configure WRF-SFIRE
cd WRF-SFIRE
./configure
Options 15 (INTEL ifort/icc dmpar) and 1 (simple nesting) if available
Compile WRF-SFIRE
Compile em_real
./compile em_real >& compile_em_real.log &
grep Error compile_em_real.log
If any compilation error, compile em_fire
./compile em_fire >& compile_em_fire.log &
grep Error compile_em_fire.log
If any of the previous step fails:
./clean -a
./configure
Add to configure.wrf -nostdinc at the end of the CPP flag, and repeat compilation. If this does not solve compilation, look for issues in your environment.
Configure WPS
cd ../WPS
./configure
Option 17 (Intel compiler (serial)) if available
Compile WPS
./compile >& compile_wps.log &
grep Error compile_wps.log
and
ls -l *.exe
should contain geogrid.exe, metgrid.exe, and ungrib.exe. If not
./clean -a
./configure
Add to configure.wps -nostdinc at the end of CPP flag, and repeat compilation. If this does not solve compilation, look for issues in your environment.
Get static data
Get tar file with the static data and untar it. Keep in mind that this is the file that contains landuse, elevation, soiltype data, etc for WRF (geogrid.exe to be psecific).
 cd ..
 wget http://math.ucdenver.edu/~farguella/tmp/WPS_GEOG.tbz
 tar xvfj WPS_GEOG.tbz
WRFx system
WRFx: Requirements and environment
Install Anaconda distribution
Download and install the Python 3 Anaconda Python distribution for your platform. We recommend an installation into the users' home directory.
wget https://repo.continuum.io/archive/Anaconda3-2020.02-Linux-x86_64.sh
chmod +x Anaconda3-2020.02-Linux-x86_64.sh
./Anaconda3-2020.02-Linux-x86_64.sh
Install necessary packages
We recommend the creation of an environment. Install pre-requisites:
conda update -n base -c defaults conda
conda create -n wrfx python=3 gdal netcdf4 pyproj paramiko dill h5py psutil proj4 pytz scipy matplotlib flask
conda activate wrfx
conda install -c conda-forge simplekml pygrib f90nml pyhdf xmltodict basemap rasterio
pip install MesoPy python-cmr
Note that conda and pip are package managers available in the Anaconda Python distribution.
Set environment
If you created the wrfx environment as shown above, check that PROJ_LIB path is pointing to
$HOME/anaconda3/envs/wrfx/share/proj
If not, you can try setting it to
setenv PROJ_LIB "$HOME/anaconda3/share/proj"
WRFx: wrfxpy
WRF-SFIRE forecasting and data assimilation in python using an HPC environment.
wrfxpy: Installation
Clone github repository
Clone wrfxpy repository
git clone https://github.com/openwfm/wrfxpy
Change to the directory where the wrfxpy repository has been created
cd wrfxpy
and in wrxpy folder
git checkout angel
General configuration
An etc/conf.json file must be created with the keys discussed below. A template file etc/conf.json.initial is provided as a starting point.
cd wrfxpy
cp etc/conf.json.initial etc/conf.json
Configure the queuing system, system directories, WPS/WRF-SFIRE locations, and workspace locations by editing the following keys in etc/conf.json:
"qsys": "key from clusters.json",
"wps_install_path": "/path/to/WPS",
"wrf_install_path": "/path/to/WRF",
"sys_install_path": "/path/to/wrfxpy"
"wps_geog_path" : "/path/to/WPS_GEOG",
"wget" : /path/to/wget"
Note that all these paths are created from previous steps of this wiki except the wget path, which needs to be specified to use a preferred version. To find the default wget,
which wget
Cluster configuration
Next, wrfxpy needs to know how jobs are submitted on your cluster. Create an entry for your cluster in etc/clusters.json, here we use speedy as an example:
{
  "speedy" : {
    "qsub_cmd" : "qsub",
    "qdel_cmd" : "qdel",
    "qstat_cmd" : "qstat",
    "qstat_arg" : "",
    "qsub_delimiter" : ".",
    "qsub_job_num_index" : 0,
    "qsub_script" : "etc/qsub/speedy.sub"
  }
}
And then the file etc/qsub/speedy.sub should contain a submission script template, that makes use of the following variables supplied by wrfxpy based on job configuration:
%(nodes)d the number of nodes requested
%(ppn)d the number of processors per node requested
%(wall_time_hrs)d the number of hours requested
%(exec_path)d the path to the wrf.exe that should be executed
%(cwd)d the job working directory
%(task_id)d a task id that can be used to identify the job
%(np)d the total number of processes requested, equals nodes x ppn
Note that not all keys need to be used, as shown in the speedy example:
#$ -S /bin/bash
#$ -N %(task_id)s
#$ -wd %(cwd)s
#$ -l h_rt=%(wall_time_hrs)d:00:00
#$ -pe mpich %(np)d
mpirun_rsh -np %(np)d -hostfile $TMPDIR/machines %(exec_path)s
The script template should be derived from a working submission script.
Note: wrfxpy has already configuration for colibri, gross, kingspeak, and cheyenne.
Tokens configuration
When running wrfxpy, sometimes the data needs to be accessed and downloaded using a specific token created for the user. For instance, in the case of running the Fuel Moisture Model, one needs a token from a valid MesoWest user to download data automatically. Also, when downloading satellite data, one needs a token from an Earthdata user. All of these can be specified with the creation of the file etc/tokens.json from the template etc/tokens.json.initial containing:
{
  "mesowest" : "token-from-mesowest",
  "appkey" : "token-from-earthdata"
}
So, if any of the previous capabilities are required, create a token from the specific page, do
cp etc/tokens.json.initial etc/tokens.json
and edit the file to include your previously created token.
For running fuel moisture model, a new MesoWest user can be created in MesoWest New User. Then, the token can be acquired and replaced in the etc/tokens.json file.
For acquiring satellite data, a new Earthdata user can be created in Earthdata New User. Then, the token can be acquired and replaced in the etc/tokens.json file. There are some data centers that need to be accessed using the $HOME/.netrc file. Therefore, creating the $HOME/.netrc file is recommended as follows
machine urs.earthdata.nasa.gov
login your_earthdata_id
password your_earthdata_password
Get static data
When running WRF-SFIRE simulations, one needs to use high-resolution elevation and fuel category data. If you have a GeoTIFF file for elevation and fuel, you can specify the location of these files using etc/vtables/geo_vars.json. So, you can do
cp etc/vtables/geo_vars.json.initial etc/vtables/geo_vars.json
and add the absolute path to your GeoTIFF files. The routine is going to automatically process these files and convert them into geogrid files to fit WPS. If you need to map the categories from the GeoTIFF files to the 13 Rothermel categories, you can modify the dictionary _var_wisdom on file src/geo/var_wisdom.py to specify the mapping. By default, the categories form the LANDFIRE dataset are going to be mapped according to 13 Rothermel categories. You can also specify what categories you want to interpolate using nearest neighbors. Therefore, the ones that you cannot map to 13 Rothermel categories. Finally, you can specify what categories should be no burnable using category 14.
To get GeoTIFF files from CONUS, you can use the LANDFIRE dataset following the steps on How_to_run_WRF-SFIRE_with_real_data#Obtaining_data_for_geogrid. Or you can just use the GeoTIFF files included in the static dataset WPS_GEOG/fuel_cat_fire and WPS_GEOG/topo_fire specifying in etc/vtables/geo_vars.json
{
 "NFUEL_CAT": "/path/to/WPS_GEOG/fuel_cat_fire/lf_data.tif",
 "ZSF": "/path/to/WPS_GEOG/topo_fire/ned_data.tif"
}
For running fuel moisture model, terrain static data is needed. This is a separate file from the static data downloaded for WRF. To get the static data for the fuel moisture model, go to wrfxpy and do:
wget http://math.ucdenver.edu/~farguella/tmp/static.tbz
tar xvfj static.tbz
this will untar a static folder with the static terrain on it.
This dataset is needed for the fuel moisture data assimilation system. The fuel moisture model run as a part of WRF-SFIRE doesn't need this dataset and uses data processed by WPS.
wrxpy: Testing
Simple forecast
At this point, one should be able to run wrfxpy with a simple example:
conda activate wrfxpy
./simple_forecast.sh
Press enter at all the steps to set everything to the default values until the queuing system, then we select the cluster we configure (speedy in the example).
This will generate a job under jobs/experiment.json (or the name of the experiment that we chose).
Then, we can run our first forecast by
./forecast.sh jobs/experiment.json >& logs/experiment.log &
Show generate the experiment in the path specified in the etc/conf.json file and under a folder using the experiment name. The file logs/experiment.log should show the whole process step by step without any error.
Fuel moisture model
If tokens.json is set, "mesowest" token is provided, and static data is gotten, you can run
./rtma_cycler.sh anything >& logs/rtma_cycler.log &
which will download all the necessary weather stations and estimate the fuel moisture model in the whole continental US.
wrfxpy: Possible errors
real.exe fails
Depending on the cluster, wrfxpy could fail when tries to execute ./real.exe. This happens on systems that do not allow executing MPI binary from the command line. We do not run real.exe by mpirun because mpirun on head node may not be allowed. Then, one needs to provide an installation of WRF-SFIRE in serial mode in order to run real.exe in serial. In that case, we want to repeat the previous steps but using the serial version of WRF-SFIRE
cd ..
git clone https://github.com/openwfm/wrf-fire wrf-fire-serial
cd wrf-fire-serial/wrfv2_fire
./configure
Options 13 (INTEL ifort/icc serial) and 0 (no nesting)
./compile em_real >& compile_em_real.log &
grep Error compile_em_real.log
Again, if any of the previous step fails:
./clean -a
./configure
Add -nostdinc in CPP flag, and repeat compilation. If this does not solve compilation, look for issues in your environment.
Note: This time, we only need to compile em_real because we only need real.exe. However, if you want to test serial vs parallel for any reason, you can proceed to compile em_fire the same way.
Then, we need to add this path in etc/conf.json file in wrfxpy, so
cd ../wrfxpy
and add to etc/conf.json file key
"wrf_serial_install_path": "/path/to/WRF/serial"
This should solve the problem, if not check log files from previous compilations.
WRFx: wrfxweb
Web-based visualization system for imagery generated by wrfxpy.
wrfxweb: Account creation
Create ~/.ssh directory (if you have not one)
mkdir ~/.ssh
cd ~/.ssh
Create an id_rsa key (if you have not one) doing
ssh-keygen
and following all the steps (you can select defaults, so always press enter).
Send an email to Jan Mandel (jan.mandel@gmail.com) asking for the creation of an account in demo server providing:
- Purpose of your request (including information about you)
- User id you would like (user_id)
- Short user id you would like (short_user_id)
- Public key (~/.ssh/id_rsa.pub file previously created)
After that, you will receive an answer from Jan and you will be able to ssh the demo server without any password (only the passcode from the id_rsa key if you set one).
wrfxweb: Installation
Clone github repository
Clone wrfxweb repository in the demo server
ssh user_id@demo.openwfm.org
git clone https://github.com/openwfm/wrfxweb.git
Configuration
Change directory and copy template to create new etc/conf.json
cd wrfxweb
cp etc/conf.json.template etc/conf.json
Configure the following key in etc/conf.json:
"url_root": "http://demo.openwfm.org/short_user_id"
The next steps are going to be set in a desired installation of wrfxpy (generated in the previous section).
Configure the following keys in etc/conf.json in any wrfxpy installation
"shuttle_ssh_key": "/path/to/id_rsa"
"shuttle_remote_user": "user_id"
"shuttle_remote_host": "demo.openwfm.org"
"shuttle_remote_root": "/path/to/remote/storage/directory"
"shuttle_lock_path": "/tmp/short_user_id"
The "shuttle_remote_root" key is usually defined as "/home/user_id/wrfxweb/fdds/simulations". So, everything should be ready to send post-processing simulations into the visualization server.
wrfxweb: Testing
Simple forecast
Finally, one can repeat the previous simple forecast test but when simple forecast asks
Send variables to visualization server? [default=no]
you will answer yes.
Then, you should see your simulation post-processed time steps appearing in real-time on http://demo.openwfm.org under your short_user_id.
Fuel moisture model
The fuel moisture model test can be also run and a special visualization will appear on http://demo.openwfm.org under your short_user_id.
WRFx: wrfxctrl
A website that enables users to submit jobs to the wrfxpy framework for fire simulation.
wrfxctrl: Installation
Clone github repository
Clone wrfxctrl repository in your cluster
git clone https://github.com/openwfm/wrfxctrl.git
Configuration
Change directory and copy template to create new etc/conf.json
cd wrfxctrl
cp etc/conf-template.json etc/conf.json
Configure following keys in etc/conf.json
"host" : "127.1.2.3",
"port" : "5050",
"root" : "/short_user_id/",
"wrfxweb_url" : "http://demo.openwfm.org/short_user_id/",
"wrfxpy_path" : "/path/to/wrfxpy",
"jobs_path" : "/path/to/jobs",
"logs_path" : "/path/to/logs",
"sims_path" : "/path/to/sims"
Notes:
- Entries "host", "port", "root" are only examples but, for security reasons, you should choose different ones of your own and as random as possible.
- Entries "jobs_path", "logs_path", and "sims_path" are recommended to be removed. By default they are defined to be in wrfxctrl directories wrfxctrl/jobs, wrfxctrl/logs, and wrfxctrl/simulations.
wrfxctrl: Testing
Running wrfxctrl
Activate conda environment and run wrfxctrl.py doing
conda activate wrfx
python wrfxctrl.py
This will show a message similar to
Welcome page is http://127.1.2.3:5050/short_user_id/start
 * Serving Flask app "wrfxctrl" (lazy loading)
 * Environment: production
   WARNING: This is a development server. Do not use it in a production deployment.
   Use a production WSGI server instead.
 * Debug mode: off
INFO:werkzeug: * Running on http://127.1.2.3:5050/ (Press CTRL+C to quit)
Starting page
Now you can go to your favorite internet browser and navigate to http://127.1.2.3:5050/short_user_id/start webpage. This will show you a screen similar than that
This starting page shows general information of the cluster and provides an option of starting a new fire using Start a new fire button and browsing the existent jobs using the Show current jobs button.
Submission page
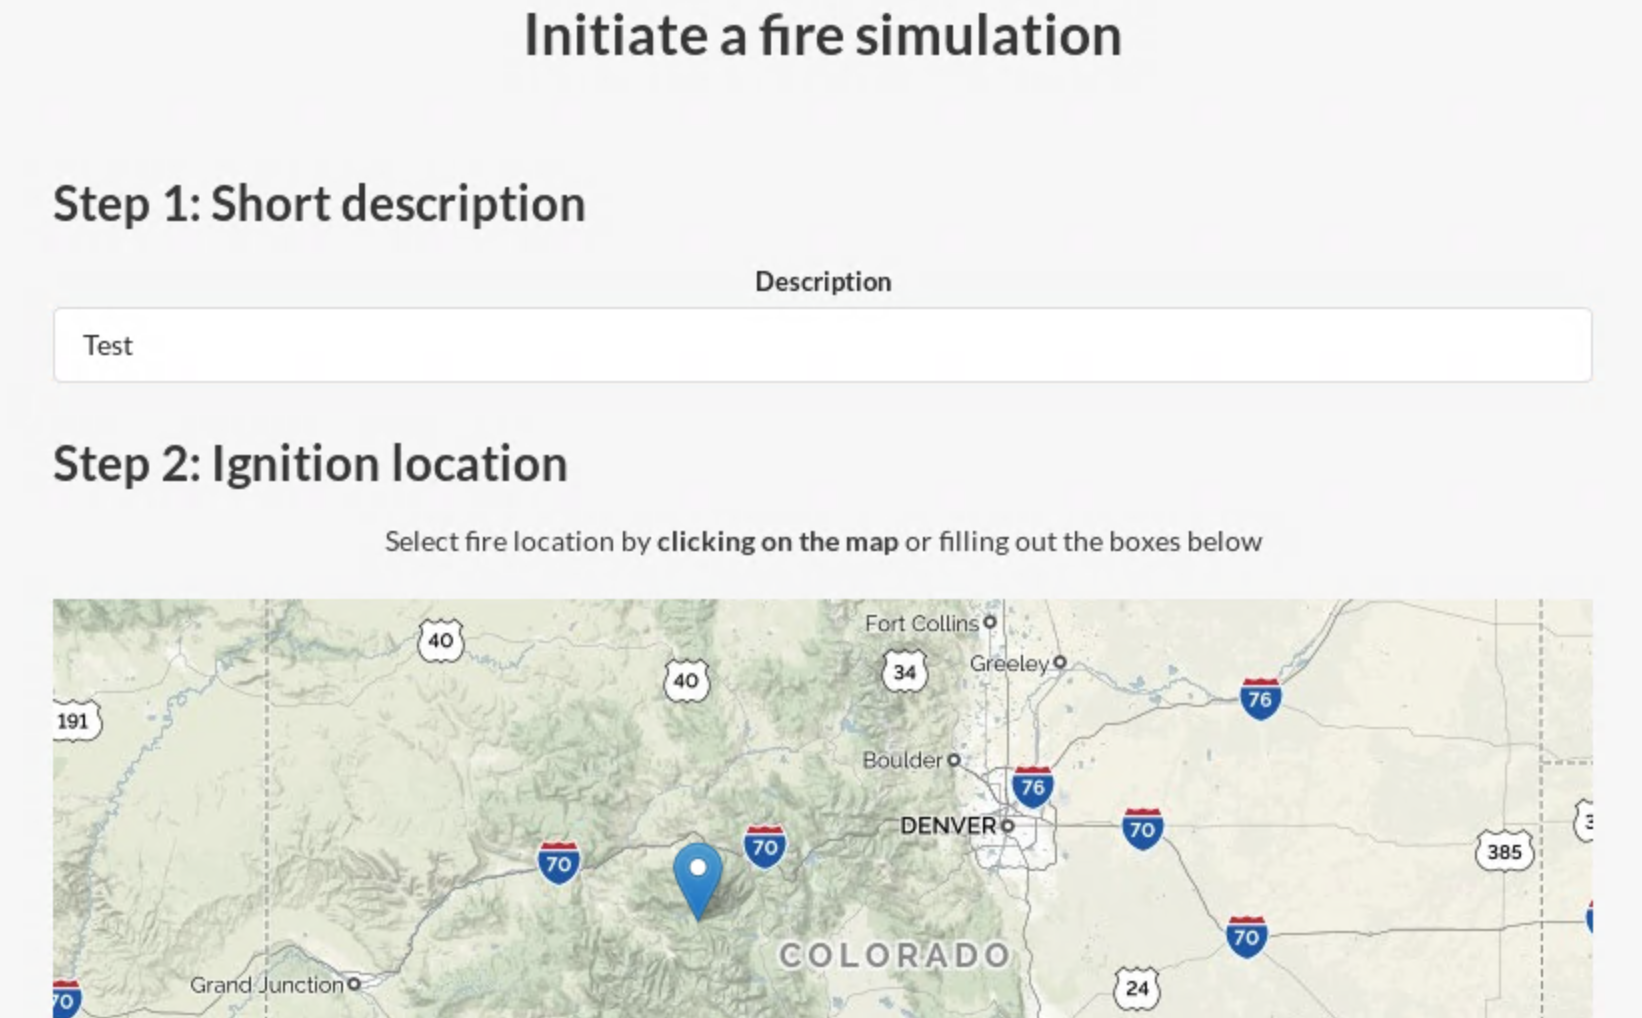
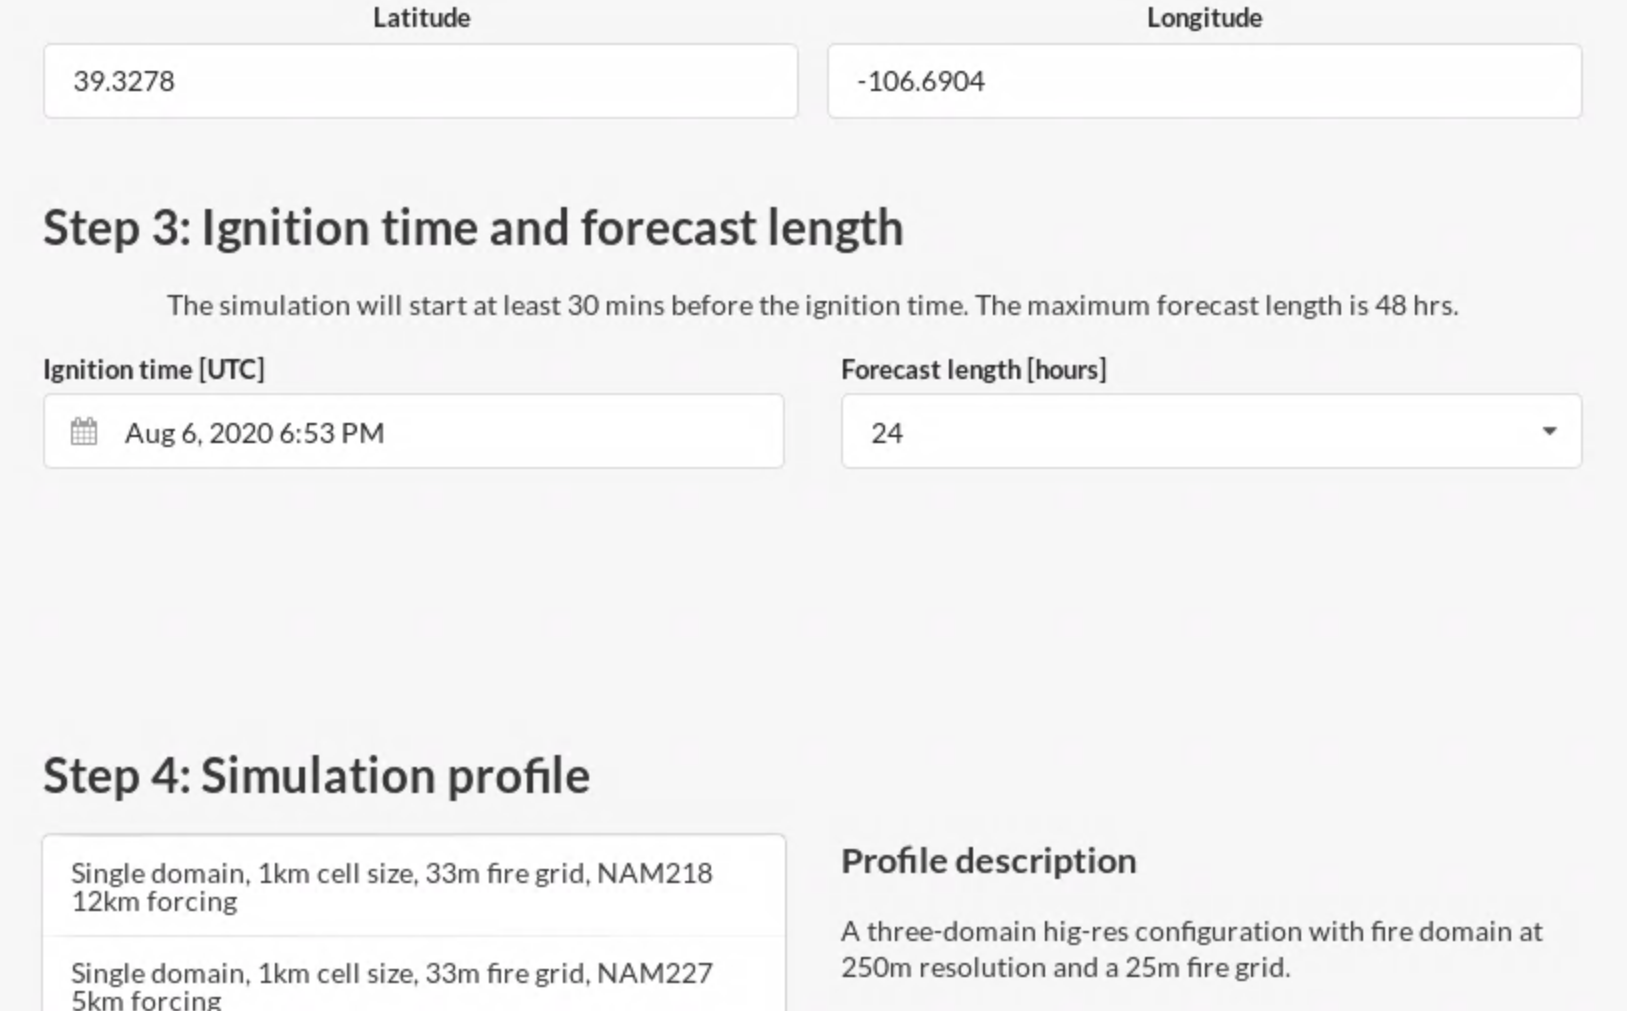
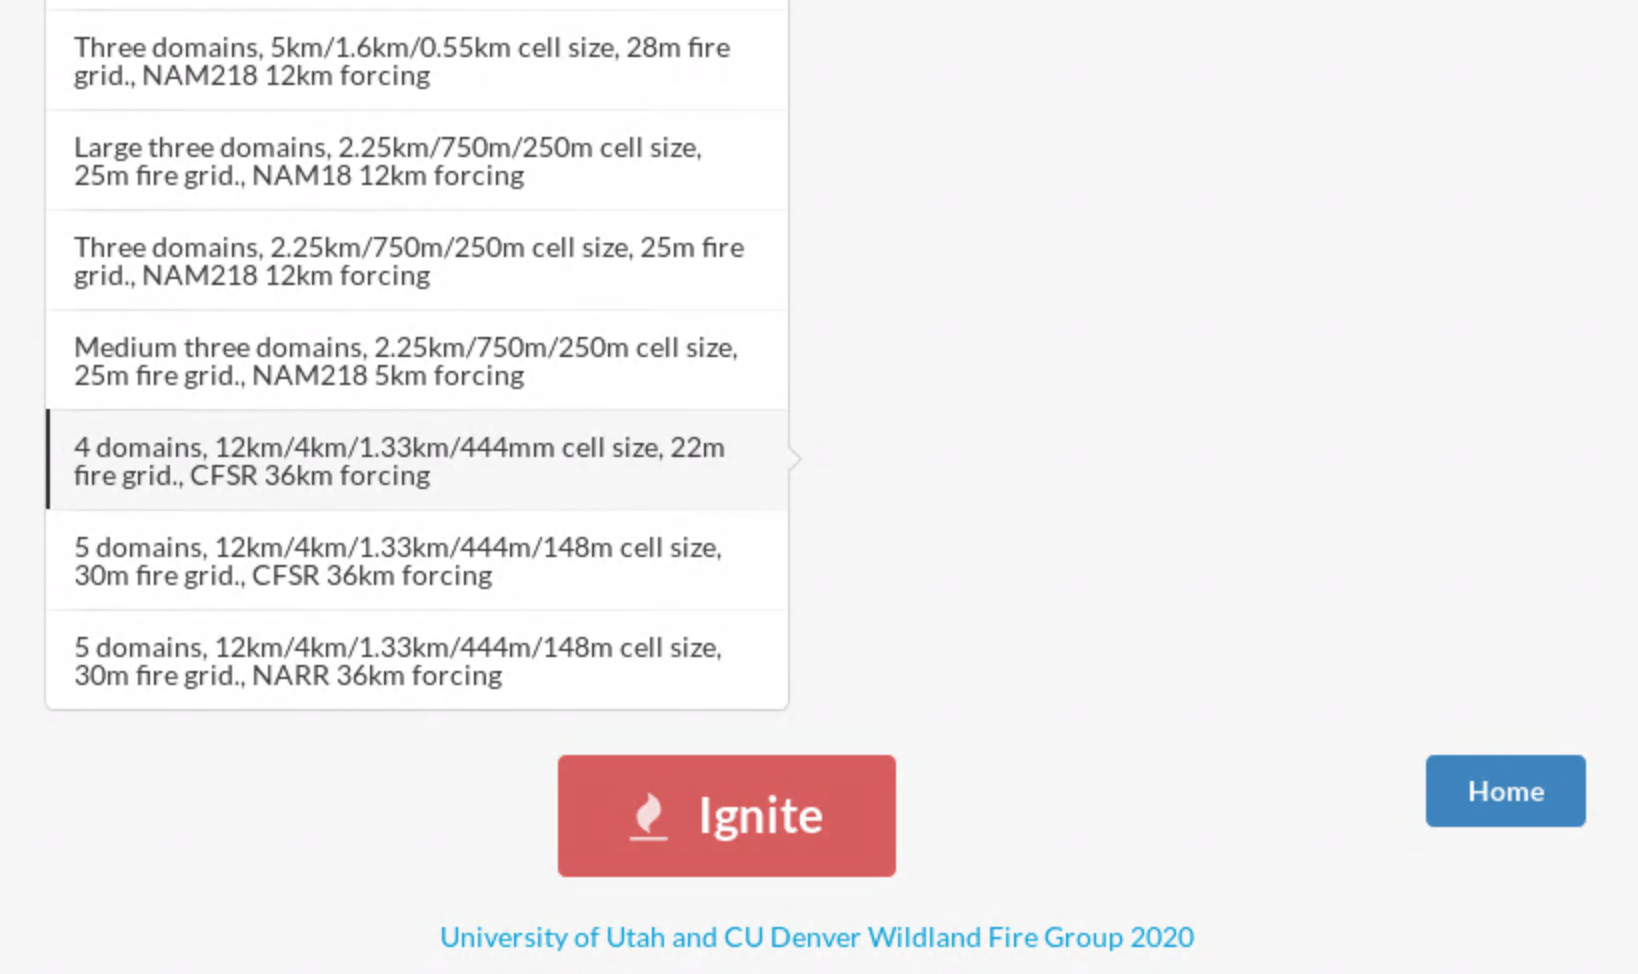
From the previous page, if you select Start a new fire, you will be able to access the submission page. In this page, you can specify 1) a short description of the simulation, 2) the ignition location clicking in an interactive map or specifying the degree lat-lon coordinates, 3) the ignition time and the forecast length, 4) the simulation profile which defines the number of domains with their resolutions and sizes and the atmospheric boundary conditions data. Finally, once you have all the simulation options defined, you can scroll down to the end (next figure) and select the Ignite button. This will automatically show the monitor page where you will be able to track the progress of the simulation. See the image below to see an example of a simulation submission.
Monitoring page
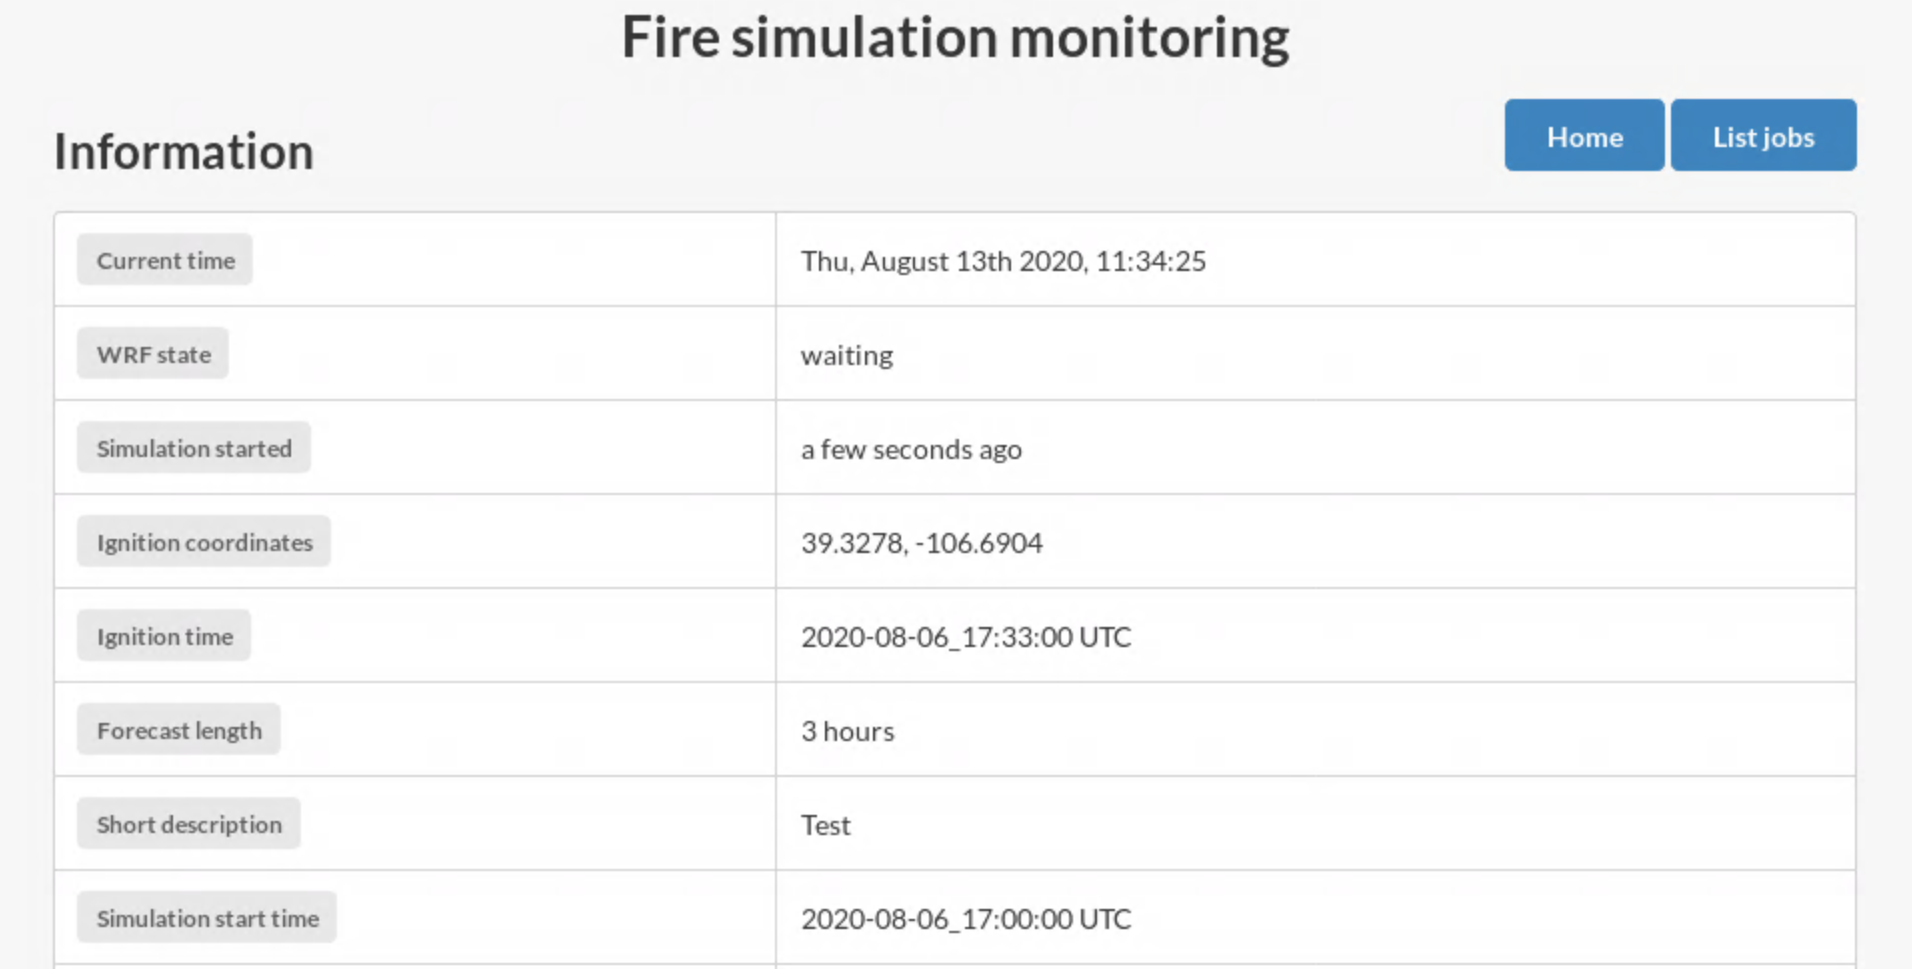
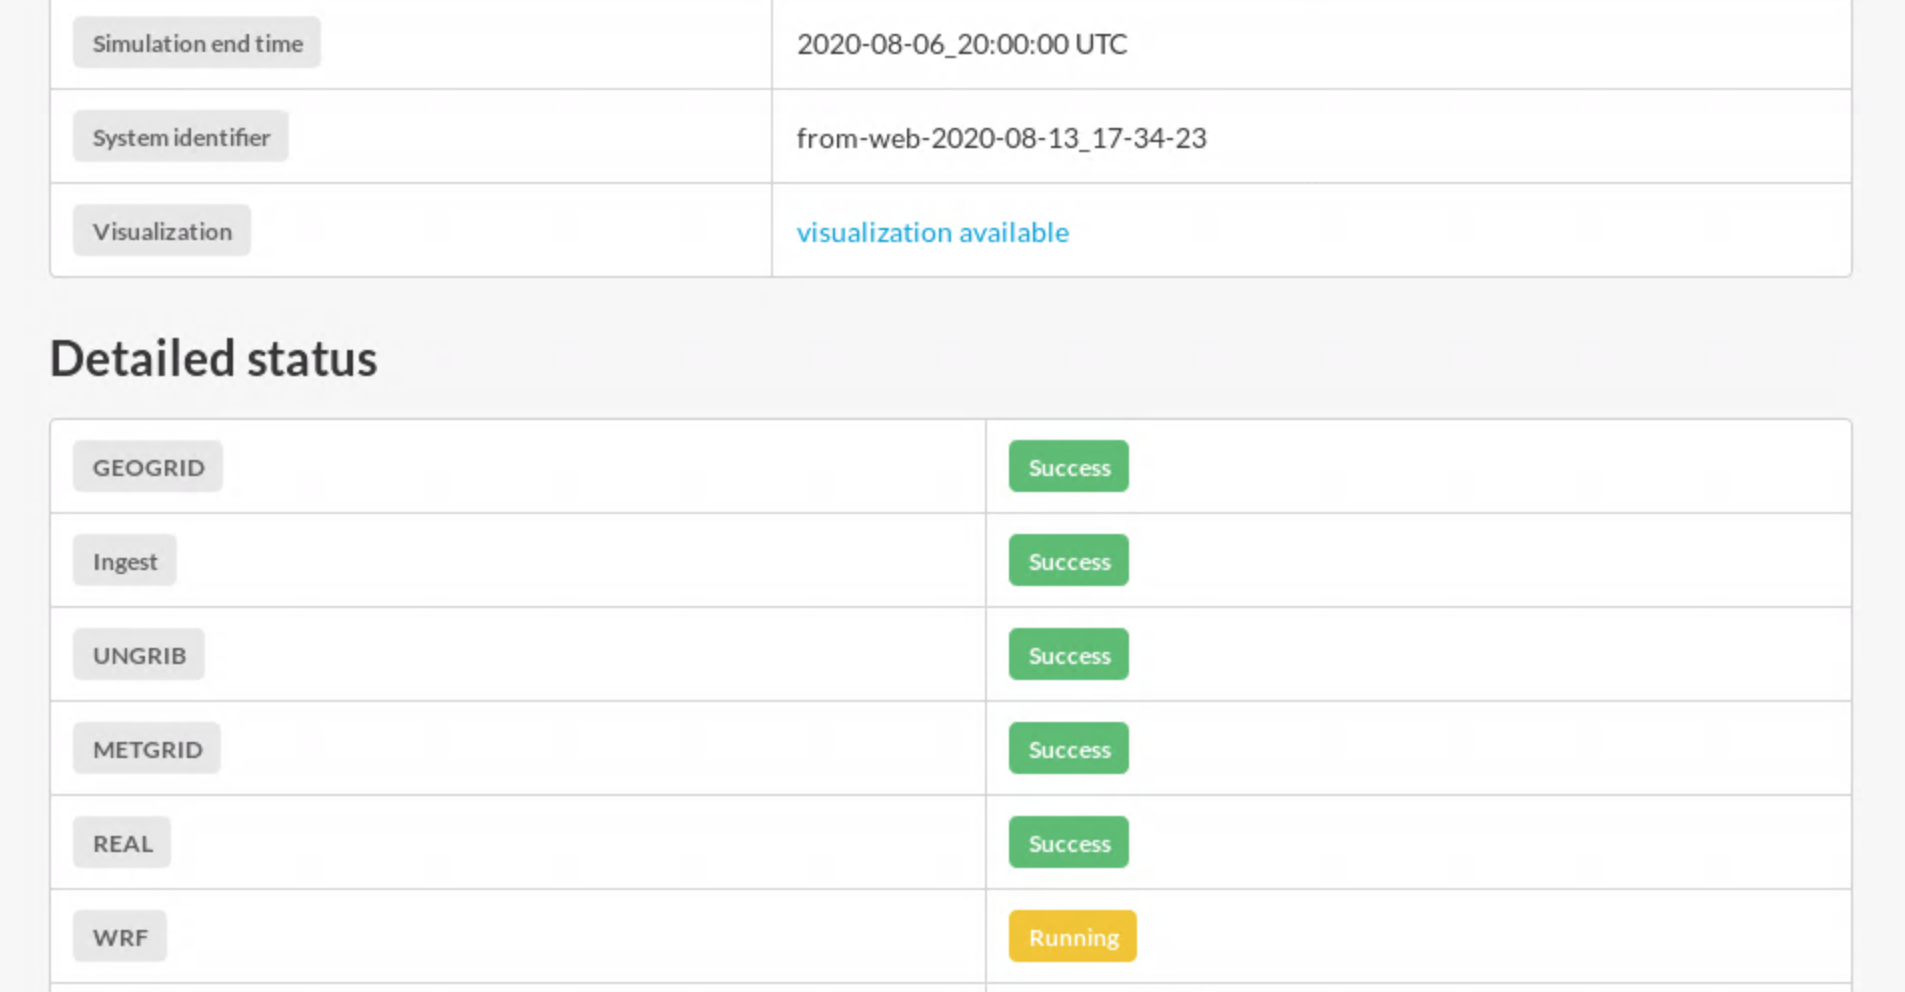
At the beginning of the monitoring page, you will see a list of important information about the simulation (see figure below). After the information, there is a list of steps with their current status. The different possible statuses are:
- Waiting (grey): Represent that the process has not started and needs to wait for the other process. All the processes are initialized with this status.
- Running (yellow): Represent that the process is still running so in progress. All processes switch their status from Waiting to Running when they start running.
- Success (green): Represent that the process finished well. All processes switch their status from Running to Success when they finish running successfully.
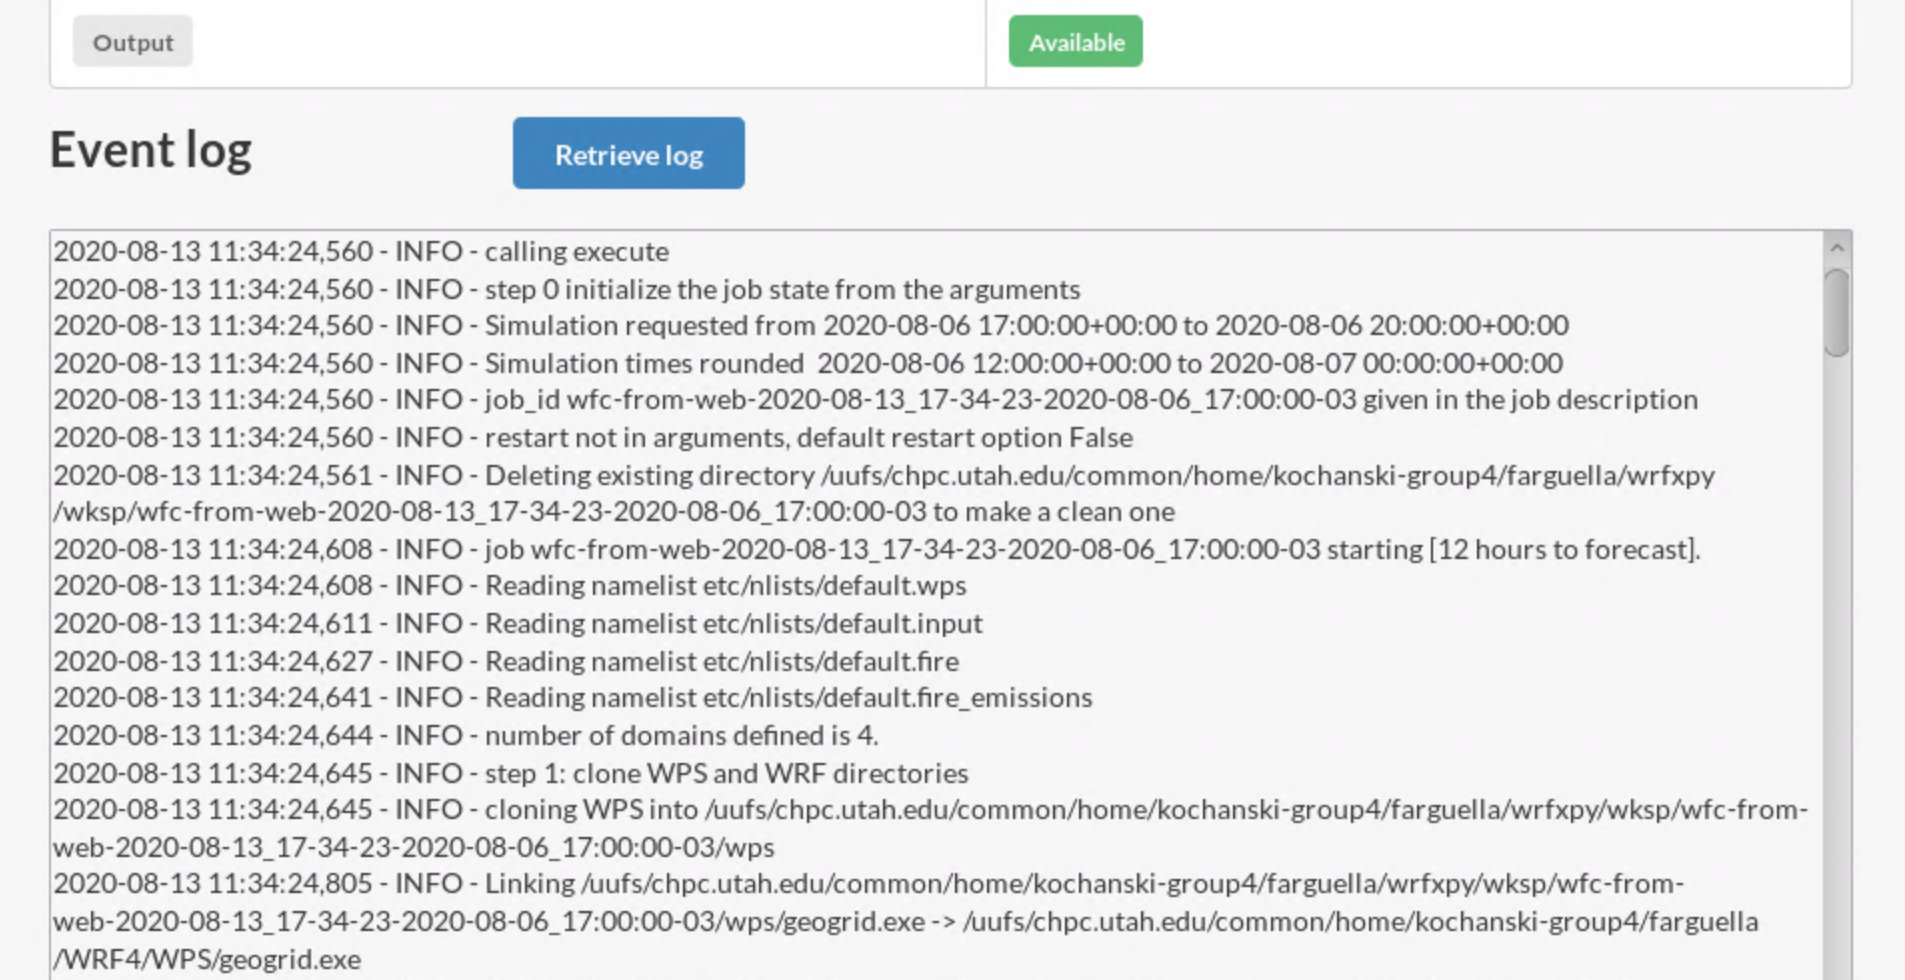
- Available (green): Represent that some part is done and some other is still in progress. This status is only used by the Output process because the visualization is available once the process starts running.
- Failed (red): Represent that the process finished with a failure. All processes switch their status from Running to Failed when they finish running with a failure.
In the monitor page, the log file can be also retrieved clicking the Retrieve log button at the end of the page, which provides a scroll down window with the log file information.
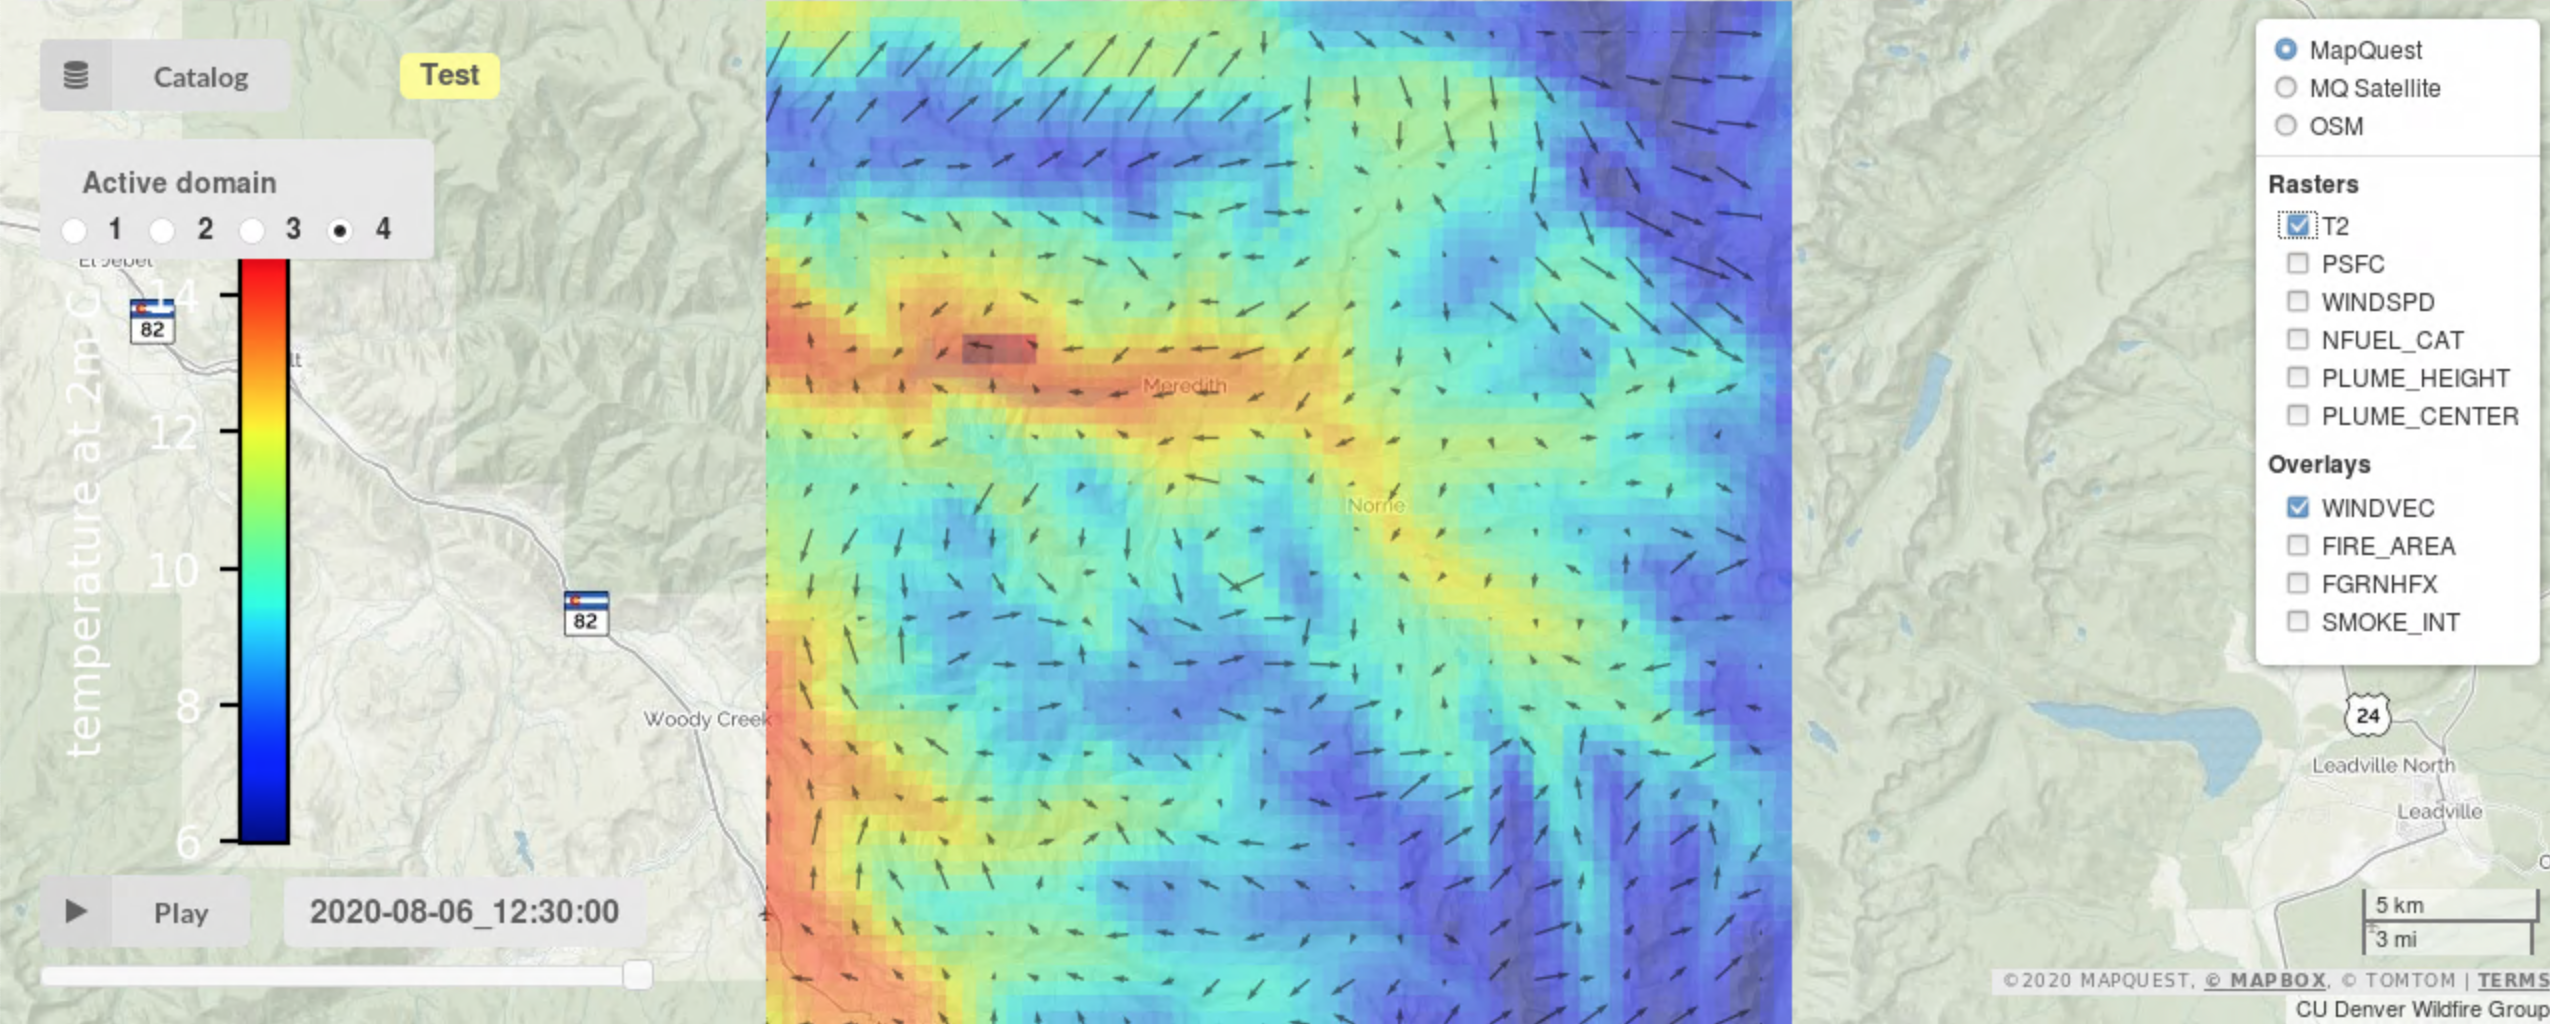
Finally, once the Output process becomes Available, in the Visualization element of the information section will appear a link to the simulation in the web server generated using wrfxweb. In this page, one can interactively plot the results in real-time while the simulation is still running
Overview page
From most of the previous pages, you can navigate to the current jobs which shows a list of jobs that are running and it allows the user to cancel or delete any simulation that has run or is running.

